
Upgrading your Samsung A10 back panel can rejuvenate your phone, giving it a fresh look and potentially improving its durability. In this guide, we’ll walk you through five straightforward steps to upgrade your back panel, ensuring your device looks and functions at its best.

Why Upgrade Your Samsung A10 Back Panel?
A new panel can protect your device from further damage, enhance its structural integrity, and even improve its resale value.
Whether your current panel is cracked, or scratched, or you simply want a new look, these steps will help you achieve a successful upgrade.
Step 1: Gather Necessary Tools
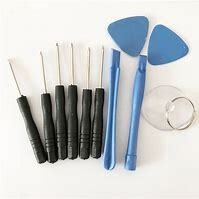
Essential Tools for the Job
– Small Phillips screwdriver
– Plastic opening tools
– Suction cup
– Tweezers
– Replacement back panel
Where to Find These Tools
These tools can be easily found online or at any electronics repair store. Investing in a small tool kit specifically designed for mobile phone repairs can be particularly useful for future fixes.
Step 2: Power Down and Remove the Back Cover

Properly Powering Down Your Device
To prevent any potential damage, power down your Samsung A10 completely. Hold the power button and select the option to shut down. This step ensures safety while you work on your device.
Removing the Back Cover Safely
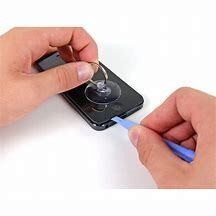
Use a suction cup to gently lift the back cover. Insert a plastic opening tool into the gap created and carefully work your way around the device to release the clips. Patience is key to avoiding cracking the cover or damaging internal components.
Step 3: Detach the Old Back Panel
Identifying Screws and Clips
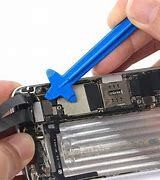
Once the back cover is off, identify and unscrew all the visible screws holding the back panel in place. Use your tweezers to remove any clips or connectors that are securing the panel.
Carefully Detaching the Panel
Gently pry the old back panel away from the body of the phone. Ensure all connectors are disconnected to avoid any accidental damage. A steady hand and a careful approach are crucial during this step.
Step 4: Attach the New Back Panel

Aligning the New Panel Correctly
Take your new back panel and align it with the body of your Samsung A10. Make sure all the screw holes and connector slots match up perfectly. This alignment is essential for a secure fit.
Securing the New Panel in Place
Reattach all the screws and clips that you removed earlier. Ensure they are tightly secured to prevent any movement of the back panel. Double-check that all connectors are properly reconnected.
Step 5: Power Up and Test Your Device
Restarting Your Samsung A10
Power up your device by holding the power button until the Samsung logo appears. This restart will help you check if everything is functioning correctly.
Testing for Proper Functionality
Check all functionalities such as the camera, buttons, and touchscreen. Ensure there are no loose parts or gaps in the back panel. If everything is in order, your upgrade is complete!
Samsung A10 back panel in other countries
- Asia: In countries like India, China, and Malaysia, local markets and shops often carry a variety of mobile parts and accessories.
- Europe: Countries like the UK, Germany, and France have specialized mobile repair shops and online stores that stock back panels.
- Latin America: Major cities in countries like Brazil and Mexico will have local shops and online options for mobile parts.
Final Thoughts
Upgrading your Samsung A10 back panel is a simple yet effective way to enhance your phone’s appearance and functionality. By following these five easy steps, you can achieve a professional-looking upgrade right at home. Enjoy your newly refreshed device!
Frequently Asked Questions (FAQs)
Q: Can I use any back panel for my Samsung A10?
A: It’s best to use a back panel designed specifically for the Samsung A10 to ensure proper fit and functionality.
Q: How long does the upgrade process take?
A: The process typically takes around 30-45 minutes, depending on your familiarity with the steps.
Q: Do I need professional help?
A: This guide is designed for DIY enthusiasts, but if you feel unsure, seeking professional assistance is advisable.